CuePlayer Tutorial
This document introduces the CuePlayer and presents a workflow for composing and performing real-time and mixed electronic works. Full details of the class can be found in the CuePlayer helpfile.
The CuePlayer is a tool which helps a composer to organise processes and musical material in bundles (cues) and execute them when needed during the course of a piece. It is particularly applicable to musical works incorporating real-time electronics and acoustic instruments; it may also be handy in any scenario where the composer wishes to organise, schedule and trigger bundles of processes.
This tutorial has been written having in mind composers who may not be highly proficient in SuperCollider programming, but who have an adequate understanding of the language and are competent in electronic and/or instrumental composition. If you are a composer who is looking for a tool to write music for instruments and electronics with SuperCollider, this is especially for you.
Basics
The first thing to do is to create a CuePlayer instance and assign it to a variable. Then we may define a tempo for the piece (in bpm) at which the processes can be evaluated, (default is 120 bpm).
a = CuePlayer.new;
a.tempo_(110);
We may now start building the cues. A cue is a bundle of code placed within a function which is linked to a cue-number. All cues are organised into an Array and later on they may be triggered via code, a GUI window or any device/software which outputs midi/osc data, such as a footpedal or a Digital Audio Workstation (DAW). Think of the cue-number as the index of the cue-list which holds all processes.
An easy way to build a cue is with the put method which allows explicitly to create a cue at a specific cue-number.
a.put(1, { "this is cue-1".postln });
a.put(2, { "this is cue-2".postln });
a.put(5, { "this is cue-5".postln });
We could also add a cue at the end of the cue-list in a similar fashion.
a.add({ "this is cue-6".postln });
When we want to execute a cue we call trigger, specifying also a cue-number.
a.trigger(1); // posts "this is cue-1"
a.trigger(2); // posts "this is cue-2"
a.trigger(3); // nothing
a.trigger(4); // nothing
a.trigger(5); // posts "this is cue-5"
a.trigger(6); // posts "this is cue-6"
a.trigger(7); // nothing
The setCurrent method sets the current cue and the next method is a quick way to trigger the next one.
a.setCurrent(5); // sets current cue to 5
a.next; // triggers cue-6; posts "this is cue-6"
Most often you will be working along with the CuePlayer window which allows the CuePlayer to be controlled via a Graphic User Interface. Through it you can monitor input/output buses, trigger cues, use a timer and a metronome and control the server's level amongst others. It is brought up with the gui method which has a handful of options to adjust it to your needs. See also the CuePlayer helpfile.
(
a.gui(
    monitorInChannels: 2, // Monitor the first 2 input channels
    monitorOutChannels: 16, // Monitor 16 output channels
    options: (
       largeDisplay: false, // Show/hide the big window displaying current cue-number
       left: 1300, // Left bound of the CuePlayer window
       top: 350, // Top bound of the CuePlayer window
          )
)
);
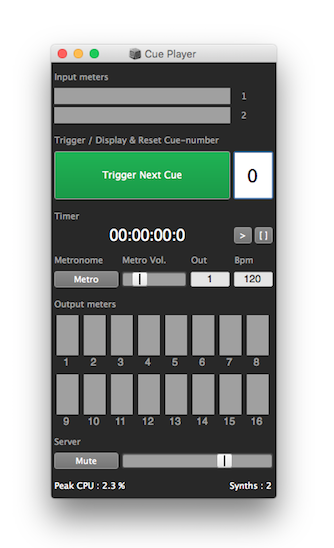
Spend a little time to get familiar with this window. You can monitor up to 8 input buses and up to 48 output buses which should be enough for most pieces, but you could easily hack the source code to change this if you like. The big green-button triggers the next cue and the white number-box right next to it displays and sets (when needed) the current cue. The timer displays the time elapsed (usually since the beginning of the piece) and the metro-button starts/stops the metronome; its volume, output-bus and tempo can be adjusted. At the bottom of the window there is a mute button to silence everything and a volume-slider to control the level of the server.
MIDI & OSC
Cues can be triggered via MIDI and OSC events.
To use midi you need to connect to your midi-devices first; then you can set up a midi-trigger on a given note and channel to trigger the next cue by calling the midiTrigger method, this allows to evaluate sequential cues upon receiving a midi-note through a specified midi-channel. It is useful when the cues need to be triggered externally (via a footpedal for example) and it applies particularly to performance scenarios where the instrumentalist uses a midi-device on stage to trigger sequential cues.
// Connect all midi devices & set up a midi-trigger for the CuePlayer
MIDIIn.connectAll;
a.midiTrigger(note: 60, channel: 15);

// Ready to trigger cues from an external midi-device hooked up on channel 15 upon sending note 60.
There is also the midiTriggerVelocity method which sets up a midi-trigger on a given note and channel based on the note's velocity value. It allows to evaluate specific cues upon receiving a midi-note with velocity (1-127) controlling the cue-number. This method is useful while composing, when for example the cues need to be triggered externally via a Digital Audio Workstation (DAW).
a.midiTriggerVelocity(note: 60, channel: 16, offset: 0);

/* Ready to trigger cues from an external midi-device hooked up on channel 16
based on the note's velocity value. */
When you want to trigger cues via the Open Sound Control protocol you can set up an OSC trigger with the oscTrigger method, which accepts a path as an argument (such as '/cueTrigger') and a message. When the message is -1 the next cue will be triggered; any other positive integer will trigger the respective cue.
// An OSC responder
a.oscTrigger(path:'/cueTrigger');

// Test it
m = NetAddr("127.0.0.1", NetAddr.langPort); // Create a net address
m.sendMsg("/cueTrigger", -1); // Send a message to trigger next cue
m.sendMsg("/cueTrigger", -1); // Trigger next cue
m.sendMsg("/cueTrigger", -1); // Trigger next cue
m.sendMsg("/cueTrigger", 2); // Trigger cue 2
m.sendMsg("/cueTrigger", 5); // Trigger cue 5
With sendOSC you may send OSC messages which may be handy while composing if you want to control a DAW that accepts OSC. See the CuePlayer helpfile.
// ip/port/message need to be adjusted to match the software's specs.
a.sendOSC("127.0.0.1", 8000, ["/play", 1]);
a.sendOSC("127.0.0.1", 8000, ["/pause", 1]);
Composing
This section outlines an example workflow for composing musical works for instruments and electronics using SuperCollider. The idea, while composing, is to try to simulate the conditions that emerge during the presentation of a piece, to try to reconstruct adequately the performance scenario in-studio, in order to test the work and solve problems both in musical and technical terms prior to the concert.
- Use your preferred Digital Audio Workstation to lay out the piece. Work with a virtual sampler instrument in order to have some sort of feedback for the instrumental part while composing.
- On a Mac OS, make sure that your DAW uses the IAC Driver which will allow midi-data to be sent internally from one application to another (Applications>Utilities>Audio Midi Setup).
- Within the DAW create a midi-track and route its output to a dedicated midi-channel (16 for example) via IAC. Place a series of midi-notes in the track exactly where the cues should be triggered. All notes need to be the same (middle Cs for example); the 1st note (corresponding to cue-1) should have a velocity of 1, the 2nd a velocity of 2, and so on ...
- In SuperCollider, make an instance of the CuePlayer and assign it to a variable. Connect to your midi-devices and call the midiTriggerVelocity method to respond to the incoming midi-data. This will allow the CuePlayer to trigger the respective cue every time it receives a note from the DAW via the specified midi-channel.
- Build your cues in SuperCollider as you progress with the instrumental part.
- Hitting "play" inside the DAW not only plays-back the instrumental part (possibly through a virtual instrument track) but also triggers the electronics in SuperCollider. If live-processing of the acoustic source is needed then the output of the virtual instrument needs to be routed (preferably internally) to SuperCollider for processing.
This scenario allows to lay out the piece in a familiar environment and audition the instrumental part along with the electronics in SuperCollider which should be triggered exactly where the score depicts. With this workflow a composer can audition the piece while it is being built, test, debug, adjust and predict with consistency how the work will sound in "real-life".
Performing
This section outlines how the CuePlayer can be used when presenting works for instruments and electronics. It's quite straight forward:
- All electronic processes need to be organised as individual cues with the CuePlayer; they are often triggered sequentially either by the instrumentalist or the laptopist.
- Plug-in any midi/osc devices to the laptop.
- In SuperCollider connect to your midi-devices and call the midiTrigger method to respond to the incoming midi-data and/or the oscTrigger method to respond to osc messages. These methods allow the CuePlayer to trigger the next cue every time a device sends midi/osc data to the laptop.
- Cues may be triggered via external devices (footpedals, switches, etc), code or the CuePlayer GUI.
Organising
A rather convenient method to organise a piece is to place the individual cues into separate scd documents and then load them in the cue-list.
// A CuePlayer instance
a = CuePlayer.new;

// Find the path of the CuePlayer class
b = PathName(CuePlayer.class.filenameSymbol.asString).parentPath;

// Load cues from individual scd files from disk.
(
a.put(
    cueNumber: 1,
    function: b ++ "HelpSource/Tutorials/cues/cue1.scd",
);

a.put(
    cueNumber: 2,
    function: b ++ "HelpSource/Tutorials/cues/cue2.scd",
);

a.put(
    cueNumber: 3,
    function: b ++ "HelpSource/Tutorials/cues/cue3.scd",
);

a.put(
    cueNumber: 4,
    function: b ++ "HelpSource/Tutorials/cues/cue4.scd",
);
);

a.trigger(1);
a.trigger(2);
a.trigger(3);
a.trigger(4);
Both put and add methods of the CuePlayer class accept a timeline as an argument which provides an easy way to schedule processes in the future; for this we need to use an Array with time - function pairs; (time is in beats or optionally in seconds). Here's an example on how to do this.
a = CuePlayer.new;
a.tempo_(120);

// Using a timeline for cues 1 & 2
(
a.put(1,
    // beat - function pairs
    timeline: [
        1, { "1 beat later".postln },
        2, { "2 beats later".postln }, // schedule something to happen 2 beats later
        3.5, { "3.5 beats later".postln }
    ],
    timelineOptions: (mode: \beats, quant: 1) // this works in beats
);

a.put(2,
    // seconds - function pairs
    timeline: [
        1, { "1 second later".postln },
        2, { "2 seconds later".postln }, // schedule something to happen 2 seconds later
        3, { "3 seconds later".postln }
    ],
    timelineOptions: (mode: \time, quant: 0) // this works in seconds
);
);

a.trigger(1); // trigger cue1
a.trigger(2); // trigger cue2
It is also possible to use scd files in a timeline.
(
a.put(1,
    timeline: b ++ "HelpSource/Tutorials/timelines/01.scd",
    timelineOptions: (mode: \beats, quant: 1) );

a.put(2,
    timeline: b ++ "HelpSource/Tutorials/timelines/02.scd",
    timelineOptions: (mode: \time, quant: 0) );
);

a.trigger(1);
a.trigger(2);
CuePlayer